Wednesday, October 19, 2011
Friday, June 3, 2011
RSVP
My birthday is coming up in a couple of weeks, and I decided that the best way to pre-celebrate was to buy something(s) for myself. But with 2 hours to spare before going to work, if I had plans of doing any sort of damage, I needed to act pronto. I decided to head out to my fav place, and got a couple of nail polishes, nail art brushes and a King Kong size of Seche Vite. Yes, you've read right, King Kong size. It's so huge, that I couldn't stop staring at it. I was all smiles, but truthfully, this was just the beginning of my soon to be wonderful day. When I got home, mom needed to get a couple of things for her trip and being the good daughter that I am, I decided to join her. As we got to the store, she headed to the travel section and I flew to where else? Nail Polish-ville!!(as if I need to expand my polish collection anymore) When I got there, I saw this beautiful purple bottle burried inside a basket with other polishes, it stood out amongst all the other colors and that was enough to make it a part of my growing familia.
Take a look:
At the end, I decided to add a touch of fancy-ness by adding rhinestones in a shape of a flower. Cute huh?
Base Coat: Essie Protein - 1 coat
Polish: Save The Date - 2 coats
Top Coat: Seche Vite - 1 coat
Take a look:
The polish is from Sally Hansen's Diamond Strength collection and the name is, Save The Date. This enamel is a rich shimmery purple, similar to the color of red wine. In the sun, it's absolutely gorgeous, you can see the shimmer come to life. I found the consistency to be more on the thick side for some reason, but a couple drops of thinner should take care of that. I am glad I found this beauty. It was destined for me to have this polish as a part of my pre-birthday purchase. I've already received tons of compliments. Now, my nails and I can be fierce and fabulous as we celebrate my birthday!
Base Coat: Essie Protein - 1 coat
Polish: Save The Date - 2 coats
Top Coat: Seche Vite - 1 coat
Monday, May 30, 2011
Lazy Manicures
Who wouldn't want to have a fabulous mani in 5 minutes? I believe all of us do.That is why I would like to present this mani that one of my best friend did during one of her lazy moods. Now, this mani has a little bit of her personality. I am always joking with her on how lazy she is and that this is why she loves using these Sally Hansen's nail polish strips. LOL The coolest thing about this product is that you do not have to go through all the steps that are involved in a regular mani (i.e basecoat, polish, dry topcoat and sitting still for the next hour). The application is simple and easy from what she tells me, and I believe her because the one thing this girl doesn't like is, strenuous activity
Here are several pics of her lazy manis...
Here are several pics of her lazy manis...
 |
| Cut It Out |
 |
| Misbehaved |
So, if you're ever in a lazy mood and are in dire need of a fabulous mani, make sure to give these stickers a try!
Have a fabulous and fierce day!
Saturday, May 28, 2011
Give me a Chance-r
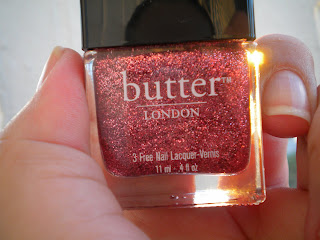
From the 3 butter LONDON polishes that I purchased, I decided to give Chancer a try. Unfortunately, Chancer didn't give me a CHANCE to enjoy her true beauty since it chipped within 24 hours of application. This polish can be described as a bright glittery red, with loads of flakes that can make your nails dance under the sun. Take a look:
This color reminds me of Dorothy from the classical movie, The Wizard of Oz. I am certain that this color will not disappoint anyone- I can almost guarantee it. The application for this polish was smooth at first, but it became quite arduous to work with by the time I got to my second hand. I noticed that the lacquer became somewhat thick, and because this polish is of the 3 Free family, I was afraid to add thinner and run the risk of damaging it's chemical properties. Thankfully, I was able to finish my mani and it looked fabulous. It's sad that I couldn't enjoy it long enough, but its ok, I have heard this is common with 3 Free polishes. I just may need to go back to the drawing board and try a couple of different things to make it last longer.
Here is my mani with Chancer.
 |
| I Coat of Flawless Basecoat |
 |
| 2 Coats of Chancer |
 |
| 1 Coat of Quick Topcoat |
 |
| Chancer under natural sunlight |
Thursday, May 26, 2011
Pass me the butter, please?
Two weeks ago I ended up at ULTA, again. I go there so much, that the staff knows me by name and salutes me with a big hug! *feels special* They always enjoy seeing my manis. This time was no different. I was there to return something, and left with OPI's new silver shatter, Space Cadet from Orly, and this new polish that I was told I had to check-out, butter LONDON. First of all, I have to say that butter's bottles are so pretty and elegant. I picked 3 colors out of the 15 they had available along with a base coat and top coat as well. Check them out:
 |
| Chancer |
 |
| Rosie Lee |
Aren't the colors beautiful? So gorgeous......
butter LONDON is a company that takes prides in making these stunning shades in the “3 Free” form. By polishes being 3 Free, they are liberated from, Formaldehyde, Toluene and DPB – which can be toxic. If you want to read up more on 3 Free, please click here.. I am glad that my nails can look fabulous without compromising my health. :0)
If you're interested in buying some healthy butter, check out their website: butter LONDON.
Stay tuned as I will be posting a mani with Chancer very soon!
Have a Fabulous and Fierce day!
If you're interested in buying some healthy butter, check out their website: butter LONDON.
Stay tuned as I will be posting a mani with Chancer very soon!
Have a Fabulous and Fierce day!
My Stash
Hola!
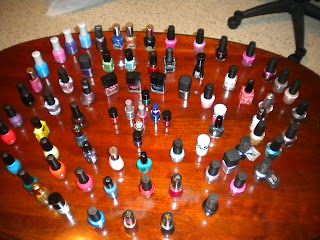
Remember how I posted on my profile that I started with 9 polishes only, and that my collection has grown since? It has grown quite a lot actually, and I've decided to take some pics of my colorful glasses. Originally, I had planned to organize them according to color or brand, but I just became lazy and spread them creatively, or at least I think I did. I try to be a smart polish shopper, but sometimes I can't resist the temptation and ultimately buy full price. It funny because my mom keeps telling me to stop buying polishes and to start saving for school. But more often than not, she's the one that benefits from these polishes as she is always asking me to do her nails. Can you believe that? Haha! I really don't mind. She's my guinea pig. I am always trying my ideas on her first. One time, I did a leopard print on her b/c she loves wild cats, and she had the biggest bitch fit. She kept on yapping about how the manicure wasn't age appropriate?? Later, she was asking me if I had posted her mani on Facebook to show my friends. Mothers, who understands them.......
Sorry, I got carried away a little bit.. lol
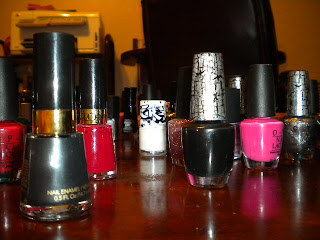
Here are pics of my growing stash:
Up from above, here we are...
 |
| Here's Sebastian, never misses the opportunity to take a pic. |
Tuesday, May 24, 2011
Always keep your promises.
Well, last week I was finally able to meet with my friend. I promised her during the beginning of the year that I would do her nails. Unforutnately, things just kept on piling up. I was busy at work, school was hectic (as always), and the worst one; my friend burned her fingers trying to make "flan" (latin dessert). The poor thing, her fingers were wrapped for weeks. I felt so bad.. Well, now that her digits have finally healed, I was able to do the mani I promised.. You know how the saying goes - better late, than never!
So here it is.....
**UPDATE** I uploaded 2 clear pictures of the colors that I used for this mani - please scroll below.
Base Coat: OPI's - Base Coat - (one coat)
Nail Polishes: Milani's - Very Teal (2 coats), Finger Paints - All you need is color (1 Coat), Sally Hansen's - Midnight in NY (nail art).
Top Coat: Seche Vite - Fast Drying Top Coat
Nail Art: I took one finger from each hand and decided to make something different, enough so that it would compliment her hand. A little pzazzas won't hurt anyone, right? lol
Left Finger: Once the nail was dried, I placed one strip of tape on each side of the nail, forming a triangle at the tip. I painted the tip with Sally's Midnight in NY, then quickly removed both strips. I took the opportunity to add a small gem on the tip of the pyramid, and sealed it with a coat of Seche Vite's (SV) fast drying top coat.
Right Finger: Once the nail was dried, I cut three thin of tapes and layered them one on top of each other. I got this idea from one of my favorite nail polish bloggers: Chloe's Nails. The idea is that the tapes are layered in a way that they resemble rays. You can place them sideways or on the top. I pressed the tape down so that my coat of Midnight in NY won't leak through the mani. Once I applied Midnight in NY, I quickly removed the strips and sealed it with a coat of SV as well.
Have a fierce and fabulous day!
So here it is.....
**UPDATE** I uploaded 2 clear pictures of the colors that I used for this mani - please scroll below.
Finger Paints - All you need is color
Milani- Very Teal
Nail Polishes: Milani's - Very Teal (2 coats), Finger Paints - All you need is color (1 Coat), Sally Hansen's - Midnight in NY (nail art).
Top Coat: Seche Vite - Fast Drying Top Coat
Nail Art: I took one finger from each hand and decided to make something different, enough so that it would compliment her hand. A little pzazzas won't hurt anyone, right? lol
Left Finger: Once the nail was dried, I placed one strip of tape on each side of the nail, forming a triangle at the tip. I painted the tip with Sally's Midnight in NY, then quickly removed both strips. I took the opportunity to add a small gem on the tip of the pyramid, and sealed it with a coat of Seche Vite's (SV) fast drying top coat.
Right Finger: Once the nail was dried, I cut three thin of tapes and layered them one on top of each other. I got this idea from one of my favorite nail polish bloggers: Chloe's Nails. The idea is that the tapes are layered in a way that they resemble rays. You can place them sideways or on the top. I pressed the tape down so that my coat of Midnight in NY won't leak through the mani. Once I applied Midnight in NY, I quickly removed the strips and sealed it with a coat of SV as well.
Have a fierce and fabulous day!
Tuesday, May 17, 2011
Ladybugs for good luck!
This mani was done a couple of months ago when I needed to take a break from the books. I was taking 5 classes and I needed some ME time. I had 3 exams the following week, and boy did I need all the luck I could get! My mom always said that if a ladybug lands on you, it's considered good luck. Keeping this in mind, I decided that I needed tons of luck for my 3 tests, and a ladybug would be the perfect charm if I wanted to ace my exams.
So here is my mani:
What did I use for this mani?
Base Coat: OPI's - Ridge Riller - One Coat
Nail Polishes: OPI's - Off with her Red (Alice in Wonderland collection) - 2 Coats AND Sinful Colors - Black on Black for the nail art.
Top Coat: Seche Vite Fast Drying Top Coat (I LOVE this stuff!!)
Nail Art: After applying the first coat of Seche Vite, I had to wait at least 10 minutes so that the nail would be dry. Once dried, I placed one strip of tape on each side of the nail, forming a triangle at the tip of my nail. I painted the tip of my nail with Sinful's Black on Black, then quickly removed the strips of tapes. I did the black dots with a toothpick, and I sealed it with a coat of Seche Vite's (SV) fast drying top coat. Voila!
I love SV, it makes your nail polish look so shiny!!
Have a fabulous day everyone!
Subscribe to:
Comments (Atom)


